
I know it's still winter, but stores have Easter merchandise on display, there was a
Serious Eats post about spring, it was 45 degrees in Chicago recently ... I got caught up. I wanted lemon cake. I like lemon bars and lemon meringue pie, but I have never wanted or made lemon cake. The promise of spring to come has altered my taste buds.
For a few weeks, I've also wanted to make petit fours (just so I could use pourable fondant). They also help with the portion control thing. It would give me a chance to brush up on my cake decorating skills since I have Wilton III soon. This will complete my second trip through the Wilton series. I still can't make a proper rose. I digress. Now that I think about it, I never liked petit fours either. The fondant was always so gross. Cakewalk in Chicago has the best tasting fondant, Satin Ice. Fondant will never taste as good as buttercream, but Satin Ice is pretty decent.
I didn't want just any old petit fours; I wanted properly-made and artistically-inspired petit fours. There was only one resource up for the task,
Pretty Party Cakes by Peggy Porschen. I love this book! I may not be able to deliver on the artistically-inspired part, but I could give it a shot.
For the cake, I used Cook's Illustrated's yellow butter cake. I use a combo of 2% milk and buttermilk, used lemon and almond extracts and added lemon zest. For reasons that allude me, I decided to bake the cake in two quarter-sheet pans. Okay. I chose those because I thought I could get away without torting. I woke up from a nap and headed into the kitchen, my judgement wasn't clear.

I hoped these were even.

These didn't brown as well as I would have liked, but they are done. Perhaps I should have trimmed the parchment more?

How tall are petit fours??! Should I tort these or just stack them on top of each other? Never again will I wake up from a nap and bake. I decided to stack the two layers. In hindsight, this was a bad idea because what did I now have? A sheet cake.
Time to brush the bottom layer with the sugar syrup. This is a lemon syrup.

Now it's time for the buttercream. I have to say that this is one of the best buttercreams I've ever made! Powdered sugar, butter, lemon juice, lemon zest and a pinch of salt. It was so bright. The lemon really cut the butter's heaviness. I gave the bottom layer a nice thick coating.


Next, I put the lemon curd on the bottom layer.
If you're following along at home, place the second layer (bottom up) on top of the first. Cover with plastic wrap and refrigerate for at least two hours.

Next is the marzipan. Marzipan is made from ground almonds. Roll it out to match the size of the cake.


Brush the cake with melted jam. I'm using citron preserves.

Cover with marzipan.

Here's where it all started to fall apart. I left my cake in the refrigerator overnight, which I think was okay. When I took it out, I let it sit for too long before trying to cut it. So yeah, I had sliding layers. Never mind that I was tying to use a cookie cutter on a sheet cake. ... I was in this predicament because I woke up and headed to the kitchen. Then I started doing chores. Yes I have learned my lesson: I will no longer wake up and try to cook.

These remnants made a great snack days later!

Moving on to the fondant. Place the fondant in a microwave safe bowl. Cover with hot water. Let it sit until the fondant is soft, about 15 minutes. Pour off the water. Add lemon juice and glucose. Microwave until runny.


Now that the fondant is melted, you should be able to dip the cakes into the melted fondant using a candy fork. Notice I said should. My too-tall cakes fell apart. The loss. The shame! The inhumanity of it all. These were still tasty, even though you had to eat them with a fork! I'll have to try again soon, when I have a whole day to devote to making them.

Tools of the trade:


 Plate and sprinkle with fresh lemon juice. The caramelized pieces are the best.

 Turn the oven on 250 degrees. If you want to cook your tomatoes overnight, turn the oven on 200 degrees. Gather some garlic, fresh basil, olive oil, sea salt and freshly ground black pepper.
  Slice the tomatoes in half, lengthwise. Toss with chopped basil, minced garlic, olive oil, salt and black pepper.
 After a couple of hours, give everything a good stir and taste. Here's where you adjust the seasonings, including adding a pinch of sugar if the tomatoes are too acidic. Park them back in the oven. When they are done, you'll have this caramelized goodness.
 Intense tomato flavor with basil and garlic. It's all good! You can also dial up the flavor with a splash of balsamic vinegar.

 Yesterday was Good Friday and it snowed! (This will make it very hard to wear white linen for Easter.) What better time to write about the Saturday I spent making soup? Roasted butternut squash soup is always a favorite. I had some sweet potatoes on hand and I wanted to see what I could do with those and some corn. The result was fabulous. It's now on my list of favorites too.
 Place the halves cut side down on the baking sheet. Use a Silpat or foil to make cleaning up easier. Roast until tender.
 In the meantime, drizzle a little olive oil into your soup pot. Add a few sage leaves and heat the oil.
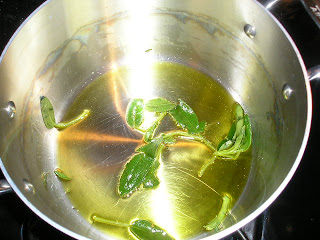


 By now the squash should be done. Grab the ice cream scoop again and dig out the flesh. Add the squash to the pot. Now whip out your immersion blender. I named mine Frenzy. Don't have one? Add the squash to a blender and ladle in some broth. Either way, process until smooth. Put the soup back into the pot and simmer.
  Now here is where you can get more creative. You can add heavy cream to the pot now for a richer soup. When serving, you can garnish each bowl with chopped pecans and/or fried sage.
 Now for the sweet potato corn soup. Start by infusing some olive oil with sage, just like the roasted butternut squash soup. Add onion and saute.


 Once the flavors meld, puree. Again, the immersion blender rocks.
  Strain the soup. (I don't like the corn bits.) I finish the soup with cream. Adjust the seasonings. I throw in a pinch of sugar. When I dish it up into bowls, I add a little bit of brandy.


 The scraps made an excellent snack!


 Tools of the trade:


